Implement JWT Authorization
JWT solutions leverage cookies for auth, which are blocked by some browser vendors. If you can’t use OAuth2 impersonation in your solution, you may need to use a JWT proxy.
Overview
In this tutorial, you are going to learn how to configure a web application to create a JWT token and send it to Qlik Cloud to authorize a user to view embedded content from a Qlik Sense application.
This tutorial focuses on the authorization flow for working with JWTs and Qlik Cloud. While it demonstrates the process through coded examples in JavaScript, it isn’t plug-and-play code.
Before you begin
-
Configure a JWT identity provider in your Qlik Cloud tenant prior to starting this tutorial.
-
This tutorial is based upon an example custom web application written with node.js. This tutorial doesn’t provide instructions on how to adapt this code to your own custom web application. The intent of the tutorial is explain the authentication flow required to use JWT authorization capabilities with Qlik Cloud.
-
Make sure to have the following information at the ready before completing this tutorial:
- The
keyidvalue for the JWT identity provider configuration - The
issuervalue for the JWT identity provider configuration - A copy of the private key used for signing JWTs sent to Qlik Cloud. This private key pairs with the public key used for configuring the JWT identity provider.
- The fully qualified domain name of the Qlik Cloud tenant where the JWT identity provider configuration is set.
- The
Create a web integration
Before you can exchange JWTs with Qlik Cloud from a browser-based web
application, you must create a web integration and add your application’s
origin to the tenant allowlist. The web integration supplies a
web integration ID that your application includes in requests to enable CORS,
cookie handling, and CSRF token retrieval.
Do the following to create a web integration and add allowed origins for your web application:
-
Open a web browser and navigate to your Qlik Cloud tenant.
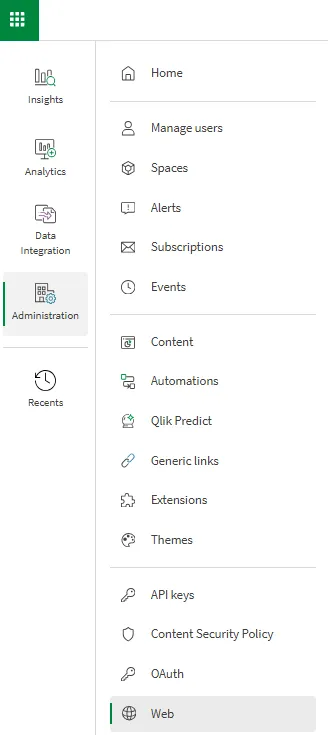
-
In the Administration activity center, go to Web:
-
Click Create new.
-
Provide a name for the web integration.
-
Enter the origin address in the format
https://domain.com. The origin is the URL for the web application containing the references to embedded visualizations.
For nonstandard ports, include the port number in the address (for example,https://domain.com:8080).
Qlik Cloud doesn’t support wildcard domains for web integration origins, so make sure to specify explicit domain addresses.
-
Click Add to include the origin in the allowlist.
-
If needed, add more origins.
-
Click Create to complete the process.
-
Copy the Web integration ID for use in your web application configuration:

Configure JWT authorization project
This project uses the qlik-cloud-jwt boilerplate repository to show you how to implement JWT authorization in your web application.
Project directory structure
.+-- README+-- package.json+-- config| +-- config.js # configuration file of references for Qlik tenant connection+-- data| +-- private.key.txt # JWT signing certificate+-- token| +-- token.js # JWT creation code+-- src| +-- app.js # code for showing content for demo purposes| +-- auth.js # the authorization flow| +-- configuration.js # code for defining nebula visualization| +-- connectQlikApp.js # code for websocket connection to Qlik| +-- index.html # html for demo purposes| +-- server.js # backend for serving code for demo purposes| +-- styles.css # css for demo purposesThis tutorial focuses on the config.js, token.js, and auth.js files so
that you learn the authorization flow for working with JWTs and Qlik Cloud.
Configure config.js
Begin setting up your project with a config.js file. In this file, you set the attributes that are used in the rest of the project to make it go.
The boilerplate starts with definitions for the different log in types available on Qlik Cloud. This is nice to have as you troubleshoot your code because you can switch between forcing an interactive log in - logging in with a userId and password - and using the JWT token you pass through to the tenant.
-
Create a
config.jsfile. Add the loginTypes object to the file if you want to toggle between interactive and JWT based authentication experiences.const loginTypes = {INTERACTIVE_LOGIN: 'interactive-login',JWT_LOGIN: 'jwt-login'} -
Add
loginTypesandcurrentLoginTypeto a new JSON object if you plan to use them.This next part of the config.js file is the section where you add information about your tenant, the Qlik Sense application id you want to embed content from,and the JWT configuration settings from your tenant. This is also where you set the currentLoginType to use.
Set the
currentLoginTypeproperty to the log in you want the project to support.module.exports = {loginTypes,currentLoginType: loginTypes.JWT_LOGIN, -
Create the
qlikWebIntegrationIdproperty and add the web integration ID you obtained in the Create a web integration section.qlikWebIntegrationId: "ENTER_WEB_INTEGRATION_ID_HERE", -
Add the
tenantDomainproperty and provide the hostname of your Qlik Cloud tenant. You can find the hostname of your tenant by logging into Qlik Cloud and reviewing the address bar in the browser.tenantDomain: "example.region.qlikcloud.com", -
Add the
appIdproperty and supply the GUID found in the URL.Embedding content from a Qlik Sense application requires knowing the unique identifier for that app on your Qlik Cloud tenant. The easiest way to obtain this
appIdis to sign in to your tenant and open the app. The app id appears in the address bar of the browserhttps://tenant.region.qlikcloud.com/sense/app/04c0e6e0-b979-4956-b65d-2122082127a1/overviewas the GUID between app and overview.appId: "bc97609f-523b-4fe9-91f6-78aa0bd1b989", -
Next, create properties for the
issuerandkeyidfrom the JWT identity provider configuration. If you haven’t completed that setup yet, follow the Create Signed Tokens for JWT Authorization tutorial.// token configissuer: "ISSUER_VALUE_FROM_JWT_IDP_CONFIGURATION",keyid: "KEYID_VALUE_FROM_JWT_IDP_CONFIGURATION" -
The completed
config.jsfile should look like this:module.exports = {loginTypes,currentLoginType: loginTypes.AUTOMATIC_LOGIN,// app configqlikWebIntegrationId: "ENTER_WEB_INTEGRATION_ID_HERE",tenantDomain: "example.region.qlikcloud.com",appId: "bc97609f-523b-4fe9-91f6-78aa0bd1b989",// token configissuer: "ISSUER_VALUE_FROM_JWT_IDP_CONFIGURATION",keyid: "KEYID_VALUE_FROM_JWT_IDP_CONFIGURATION"};
Add the private key file to the project
The private key you generated from the tutorial
Create Signed Tokens for JWT Authorization
is needed in the project to sign the token you are going to create in the next
section. Place the private key file into a folder named .data.
Configuring the token.js file
The token.js module is the code for generating the JWT (JSON Web Token) used
to authorize users to Qlik Cloud. The code requires the config.js file and
reads the private key so it can sign the JWT and ensure the data inside is
verifiable by the JWT identity provider configuration. Signing the JWT is
handled by the jsonwebtoken module found on npm.
Here are the lines that import those components into token.js.
  const jsonWebToken = require("jsonwebtoken");  const fs = require("fs");  const uid = require('uid-safe');  const config = require("../config/config");
  const key = fs.readFileSync(".data/private.key.pem", "utf8");
The generate function does all the heavy lifting in this file and there are
two important variables to make note of; the signingOptions and the payload.
The signingOptions variable is a JSON object providing the information used to
verify the JWT and how long the JWT can be used.
For Qlik Cloud to validate the JWT, the signing options must include all the
properties in the code below. The keyid and issuer come from the JWT
identity provider configuration. The algorithm must be set to "RS256" and
the audience must be set to "qlik.api/login/jwt-session".
The jsonwebtoken library converts these property names to standard JWT fields:
keyidbecomeskidin the JWT headeralgorithmbecomesalgin the JWT headerissuerbecomesissin the JWT payloadaudiencebecomesaudin the JWT payloadexpiresInbecomesexpin the JWT payloadnotBeforebecomesnbfin the JWT payload
The expiresIn property defines the expiration date/time of the JWT.
This property doesn’t determine the session cookie Qlik Cloud returns to
provide access to content.
Here is an example of a valid signingOptions object:
const signingOptions = { keyid: config.keyid, algorithm: "RS256", issuer: config.issuer, expiresIn: "30s", //Expires 30 seconds after the issue date/time. notBefore: "1s", //JWT is valid 1 second after the issue date/time. audience: "qlik.api/login/jwt-session" };The time between the notBefore and expiresIn must not exceed
sixty minutes (3600 seconds).
The payload variable is a JSON object containing information describing the
user seeking authorization to Qlik Cloud.
When using the jsonwebtoken library, set user-specific information in the
payload object. Validation and timing claims are set through signingOptions
instead. The library will automatically combine these to create a complete JWT
with all required claims.
User-specific claims to set in the payload:
sub- The main identifier (aka subject) of the user.subType- The type of identifier the sub represents. In this case,useris the only applicable value.name- The friendly name to apply to the user.email- The email address of the user.email_verified- A claim indicating to Qlik that the JWT source has verified that the email address belongs to the subject.jti- (JWT ID) A unique identifier for the JWT. Theuid-safelibrary generates this in the example code.
Optional claims:
groups- An array of group names. This is the only optional claim currently read by Qlik Cloud.
Auto-generated by the library:
iat- The issued at timestamp. Thejsonwebtokenlibrary adds this automatically.
In the token.js code, the generate function requires sending in the sub,
name, email, and groups as an array:
  const payload = {    jti: uid.sync(32), // 32 bytes random string    sub: sub,    subType: "user",    name: name,    email: email,    email_verified: true,    groups: groups  };
  const signingOptions = {    "keyid": config.keyid,    "algorithm": "RS256",    "issuer": config.issuer,    "expiresIn": "30s",    "notBefore": "1s",    "audience": "qlik.api/login/jwt-session"  };
  const token = jsonWebToken.sign(payload, key, signingOptions);  return token;
The library automatically adds iat and converts expiresIn and notBefore to
Unix timestamps (exp and nbf claims).
After signing with the signingOptions and private key, here is what the
complete decoded JWT looks like:
{ "sub": "SomeSampleSeedValue", "subType": "user", "name": "Hardcore Harry", "email": "harry@example.com", "email_verified": true, "groups": ["Administrators", "Sales", "Marketing"], "jti": "k5bU_cFI4_-vFfpJ3DjDsIZK-ZhJGRbBfusUWZ0ifBI", "iat": 1658416389, "iss": "https://my-custom-jwt", "aud": "qlik.api/login/jwt-session", "nbf": 1658416390, "exp": 1658416690}This example shows the complete JWT payload after the jsonwebtoken library has
signed it. Notice how the library:
- Kept your payload claims (
sub,subType,name,email,email_verified,groups,jti) - Added the auto-generated
iattimestamp - Added claims from your signing options (
iss,aud,nbf,exp)
You don’t need to manually add iss, aud, nbf, or exp to your payload
object. The library handles this through signingOptions.
The kid (Key ID) from signing options appears in the JWT header, not the payload.
Depending on the library you use to sign JWTs, you may have to manually assign
iat and jti values to the JWT payload. Many JWT signing libraries,
like jsonwebtoken for Node.js, add the iat attribute automatically upon JWT
signing. Refer to the documentation for the JWT signing library you are
using to determine how iat and jti are handled.
auth.js file review
The auth.js file sends the authorization token to Qlik Cloud and obtains the
required response information to render content. The code works this way:
-
Gets the configuration information from
config.jsto begin the authorization process.const { tenantDomain, qlikWebIntegrationId, appId, currentLoginType, loginTypes } = await fetch("config").then((resp) => resp.json()); -
Checks which authentication and authorization method to use; interactive or JWT.
if(currentLoginType === loginTypes.JWT_LOGIN) await handleAutomaticLogin()else if (currentLoginType === loginTypes.INTERACTIVE_LOGIN) await handleUserLogin() -
Performs the appropriate log in based on the method set in
config.js.-
In
JWT_LOGINmode, the code requests a token and performs the authorization with Qlik Cloud.async function handleAutomaticLogin() {const { token } = await fetch("token").then(resp =>resp.json());const login = await fetch(`https://${tenantDomain}/login/jwt-session?qlik-web-integration-id=${qlikWebIntegrationId}`,{method: "POST",credentials: "include",mode: "cors",headers: {"content-type": "application/json",Authorization: `Bearer ${token}`,"qlik-web-integration-id": qlikWebIntegrationId},rejectunAuthorized: false});} -
In
INTERACTIVE_LOGINmode, the code redirects the browser to the log in page for the tenant. Upon successful authentication, Qlik Cloud redirects back to the web application.async function handleUserLogin() {const response = await fetch(`https://${tenantDomain}/api/v1/csrf-token`, {credentials: 'include',headers: { 'qlik-web-integration-id': qlikWebIntegrationId }})if(response.status === 401) {shouldLoginBox.style.display = 'block'const loginUrl = new URL(`https://${tenantDomain}/login`);loginUrl.searchParams.append('returnto', window.location.href);loginUrl.searchParams.append('qlik-web-integration-id', qlikWebIntegrationId);loginLink.href = loginUrl.href;}}
-
-
Before requesting any content from Qlik Cloud, the web application needs to obtain a cross-site request forgery token. The CSRF token acts as an additional handshake between the web application and Qlik Cloud that requests coming from the web application are valid.
const csrfTokenInfo = await (await fetch(`https://${tenantDomain}/api/v1/csrf-token?qlik-web-integration-id=${qlikWebIntegrationId}`,{credentials: "include",headers: {"Qlik-Web-Integration-ID": qlikWebIntegrationId}}));
The code requires the double use of await to ensure the
browser completes the preflight request to the csrf-token endpoint and the
GET request to return the cross-site scripting token.
It’s now possible to make a request for content from Qlik Cloud by including the web integration ID and CSRF token in the URL.
Configuring Qlik Cloud to allow iframe embedding in your web application
To embed Qlik Sense visualizations using iframes in your web application, you must configure a Content Security Policy (CSP) entry in your Qlik Cloud tenant.
Content Security Policy (CSP) is a browser mechanism for mitigating and preventing cross-site scripting (XSS) attacks. When you set a CSP header in the management console, Qlik components embedded in external web applications can render correctly.
Do the following to configure a CSP entry:
-
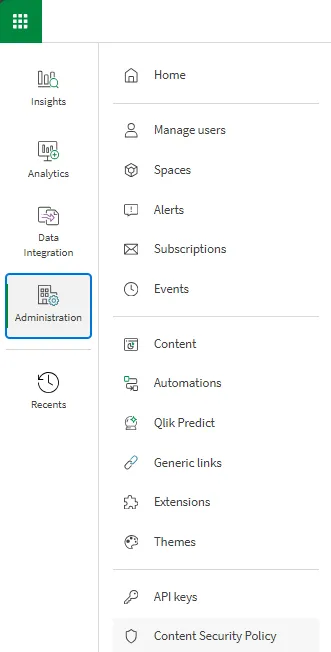
Open a web browser and navigate to your Qlik Cloud tenant.
-
In the Administration activity center, go to Content Security Policy:
-
Click Add.
-
Provide a descriptive name for this CSP entry.
-
Enter the origin for the web application in one of the following formats:
domain.com*.domain.com
-
Select the frame-ancestors directive.
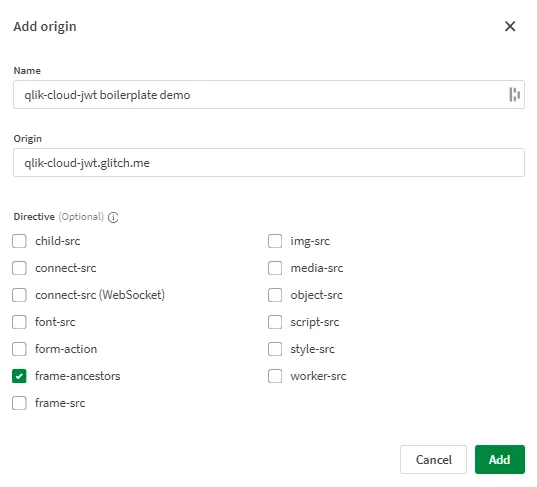
- Click Add to complete the configuration.
Your CSP entry is now active. Visualizations embedded via iframe in your web application can now render from the origins you specified.
Conclusion
The aim of this tutorial is to help provide understanding for configuring JWT authorization to Qlik Cloud through a web application.